Friday, 11 February 2011

The Stampman's Hearts Challenge

Morning lovely Bloggers. Here we are at the end of another week which means it's the start of a new challenge at The Stampman.

This week we are asking you to think about Hearts and for my design project I wanted to get away from the usual red, black and pink associated with Valentine's and this is what I came up with.


It started life when I saw an article in this months Craft Stamper about making a background by stamping onto cream and white paper with different background type stamps, ripping them into strips and sticking them together in a collage effect on an A4 piece of card before giving them a coat of gesso. I used various stamps from the Aspects of Design Nautical and Daisy Daydreams stamps and some old music paper I had in my stash (thanks Janet). This was the end result.


I then gave mine a very thin coat of lime green acrylic paint wiping it on with a baby wipe. When it was all dry a very pale starburst stain was daubed all over to give it a shimmer. I then stamped some swirls from Kay Carley's Funky flowers around the edge in Peeled Paint Distress Ink.

The Heart was triple embossed with Cosmic Shimmer UTEE and then stamped into with a Funky Flower stamp and highlighted with moonglow mica powder. I then wrapped some gold thread around it.


I coloured some scraps from the background strips with Broken China Distress Ink and clear embossed them for the little bits on the edge and then made some more hearts by hand cutting them from thin card and adding more UTEE until the colour was deep enough. One was added to the Swirly clip with some seed beads.


The sentiment was done on the computer and coloured with more Broken China.


It started life as a card but I always begin with just a basic idea and things tend to develop as I go along so I ended up with a wall hanging!!

The Stampman has all the products I used (apart from the music paper and the ribbon which was some I found on holiday in Austria last year) in stock at their shop or on the website and we can't wait to see what ideas you come up with this time.

Thanks for stopping by and have a great weekend.

Wednesday, 9 February 2011

WOYWW-Not Much Really

Afternoon lovely Bloggers and Happy WOYWW. How's your week going so far? Can you believe it's Wednesday again already. I really don't know where the weeks go to.


I'm sorry to say there isn't much on my workdesk this week. I've been having a big tidy up and trying to organise myself better so the only thing on my desk is a binder full of Scrabooking magazines that I've been looking through in the hope of finding some new ideas.


I've had a sticky time mounting all my rubber stamps onto U- Mount. Is there a worse job? They have then all been mounted onto laminated sheets and filed away hopefully in some sort of order.


I've also organised all my card and paper into colour schemes and done the same with my scrap in the hope that it'll be used more.


I was very lucky to receive some beautiful cards from some wonderful Blogging buddies recently when yet another birthday slipped by and it always seems a shame to put them away after a week, so I display them in my craft room along with all the other things I've received over the years and bits and pieces that have been collected.

If you're wondering why on earth I'm showing you all this, it's the madness that has become WOYWW. If you want to discover more then you need to pop over to see the lady in charge, Julia, who will make you very welcome and explain what it's all about.

Just to prove that a little bit of crafting has happened in The Craft Garden, here is another card I made using those beautiful Marion Emberson stamps stamped on a Nestie that works beautifully with these shaped cards from Craftwork Cards.

I was thrilled to receive an award from a Australian Blogger I met through WOYWW, Shaz In Oz, who is a very talented Calligraphy artist, among other things. As you know, I can never choose who to pass awards onto, everyone deserves them, so please help yourself if you'd like it.


Thanks for stopping by and for all of you out there who love doing challenges I have just heard of another one that is starting up. You can find them here. They are also looking for new DT members. These days when there are so many craft shops disappearing it's lovely to hear about a new one. Just Traceys Crafts are based in the West Country and I know they'd love your support.

Saturday, 5 February 2011

A Touch Of Love

Afternoon lovely Bloggers. Are you surviving this awful weather? We've had terrible winds over the last couple of days but I know my Blogging buddies in Scotland have just about been blown away. I hope it's better for you today. We just have rain here.

I've been nursing a horrible cold this week that waited until I'd been out for a belated Birthday lunch with a friend on Wednesday before it decided to really hit home so I can't complain really. Thankfully, it's a lot better today so I've been making marmalade and these are the results.


It looks yummy doesn't it. I don't like sweet marmalade so find making my own I can get it just right. This little lot should last until next January, I've just finished last year's batch. If you'd like the receipe you can find it here.


I also managed to finish the Valentines card that was on my desk the other week so here it is. It's very simple and straight forward. I stamped one half and used embossed red card for the other with some heart ribbon in the middle. I used a Martha Stewart punch on black card and the sentiment is computer generated.

As we are nearly at Valentine's Day I'd better show you another one I made.


For this one I used the big SU Medallion stamp just clear embossed on black card. The heart was hand cut and mounted on some paper I made myself on the computer. I'm going to enter this one into the Try It On Tuesday challenge this week which is Love and they are being sponsored by One Stop Card Crafts so it's well worth checking out.


Thanks for stopping by and enjoy the rest of your weekend.

Tuesday, 1 February 2011

Making A Statement

Morning everyone. I thought they said it was supposed to feel a bit milder today, it doesn't feel it to me, although I am struggling with a bit of a cold so maybe that's it. The sunshine has just made an appearance though which is nice to see.

Frankie over at Tag It On has set the challenge of a tag Making a Statement this week. I knew straight away that I wanted to use my favourite poem "He Wishes For The Cloths Of Heaven" by WB Yeats but wasn't sure how to include it. In the end I decided to just use the last two lines which is my favourite bit and used the computer to print it on. A tricky operation. You have to print it on a piece of A4 paper first and then tape the tag over the text in the right place with some masking tape and then run it through the printer again. It took two attempts to get it right, but I think it looks OK.


I used a paper mask for the moon and then blended some pigment ink over it shading from light to dark. I love using pigment ink because you can blend it to get a lovely soft effect. It stays wet longer so you can keep playing with it and the colours blend into themselves easier than dye inks.


I used the same ink to stamp this beautiful butterfly stamp from Imagination Crafts.

Thanks for stopping by and enjoy your Tuesday.

Friday, 28 January 2011

Exciting News

Morning dear Bloggers. Is it really Friday again?

Thank you so much to everyone who cheered me up on Wednesday and I'm sorry to be glum. Like everyone I have days that get me down but I don't usually bring it to Blogland. This is a place to be cheerful and creative.

And on that note, I have really exciting news. I have been invited to join the extremely talented design team at The Stampman, which is a great honour as I have admired the team's work for a long time. I can't tell you how thrilled I am and look forward to joining a great group of people.

The theme for this fortnights challenge is Oriental and I decided to push the boat out for my first project and do a little box.


The stamps were an Habico set I bought from The Stampman on my last visit. I coloured them with the the blue starburst stain from the May Day Meadows set and Worn Lipstick Distress ink, painting it on with a water brush. The edges of each panel had Broken China distress ink rubbed around them.


The little dragonflies flying around inside were from an unmarked set of stamps, sorry about that. I needed a mirror image for them and these are hard to come by. They were painted with the blue starburst stain from the French Country set. All the products can of course be purchased from The Stampman.

Thanks for stopping by and I hope you all have a lovely weekend.

Wednesday, 26 January 2011

WOYWW and A Bit Of Scrapbooking

Afternoon lovely Bloggers. How's your Wednesday going?

I feel a bit world weary today having just got back from a Funeral this morning so am looking forward to having a good nosey round all your work desks later to cheer myself up. I know I'll find some lovely things happening and some lovely people to chat too. If you want to join in with this huge thing that has become WOYWW then pop over to Julia's blog and see what it's all about.


This was my desk this morning, just as I'd left it yesterday with a card well on the way to being finished. I've been having a play with keeping things a bit simpler and found this layout which I like. Just by altering the colours it works for so many occasions. I think this one may well be Hubby's Valentine's card. Good job he doesn't keep tabs on my blog!!

I also managed to do a Scrapbook layout at the weekend, the first one of the year. I really must try and get more done, as I said in my last post I have so many photos just crying out to be scrapped.


This was the photo of the ice crystals on the car window I showed you a while ago. I wanted to keep the colours icy so cut up some Stampin Up paper and painted it with Cosmic Shimmer mica powder to match the main paper. It shimmers beautifully in real life.


I pleated some organza ribbon along the photo and then sewed the beads into it so that they dangle and the flowers were cut from tissue paper with the Tim Holtz Tattered Florals die. I sprayed them with perfect pearls so that they shimmer too.

Before I go I have to say a big thank you for two lovely awards I received this week from two of my newest followers.

The first one was from Sue
and the second from Holly
Thank you so much ladies, I feel very honoured to receive them. I always find it so difficult to choose who to pass them on to as each and everyone deserves them so please fell free to help yourselves.

There are conditions attached but please forgive me if I pass on those today, I'm just not feeling up to it at the minute.

Well that's me done for today, sorry it's a bit short and sweet but thanks for stopping by and for the wonderful comments you leave, I love reading them.

Saturday, 22 January 2011

Busy Doing Nothing

Evening lovely Bloggers. I hope you've had a lovely Saturday. We have missed that beautiful sunshine from yesterday. Today has been cold, grey and dismal in Yorkshire.

It's been one of those weeks when I seem to have been incredibly busy but now it's the weekend wondered what I've actually done. We just seem to be catching up with everyday stuff.

I did manage to make some cards with the beautiful stamps I won from Sheena Douglass so thought I'd share one of those with you tonight.


This is my favourite. She's so lovely and chubby and a joy to colour. I painted her with distress inks and applied a little bit of Broken China with cut and dry around the top for the sky. The blue matting was done with a promarker (I used the same colour to colour the card candy) and the pink with some paper from my new Polka Doodles CD.


I used one of the extra flower stamps in the set to emboss the background with the pink sparkly WOW powders from the Spring set which was also in the prize and lastly cut out the flowers in the jar as an embellishment.

One of the things I've been doing this week is trying to get to grips with the manual options on my camera. I always use it on automatic but after having another go at photographing the stars and moon the other night and having to google how to photo the moon as all I was getting was a blur, I realised I needed to learn more about shutter speeds and aperture openings. It's all still a bit like a foreign language but I'm getting there slowly.

Here is my best attempt at the moon, no longer a blur.


And this was the beautiful sky at sunrise out of DD's bedroom window yesterday morning.


I really must get some of my photos scrapbooked, I have so many I want to do. Oh well, they'll just have to be added to that never ending list of "to do" jobs.

Thanks for stopping by and enjoy the rest of your weekend.

Wednesday, 19 January 2011

Triple Embossing Tutorial

Afternoon lovely Bloggers. It's a beautiful day here with sunshine and blue skies which are so welcome after the wet weekend.

My very good blogging friend, Jill, has asked me to do a tutorial on Triple embossing and while I do not claim to be any kind of expert and I am sure there are already many excellent tutorials out there on the web, I am more than happy to share how I do it.

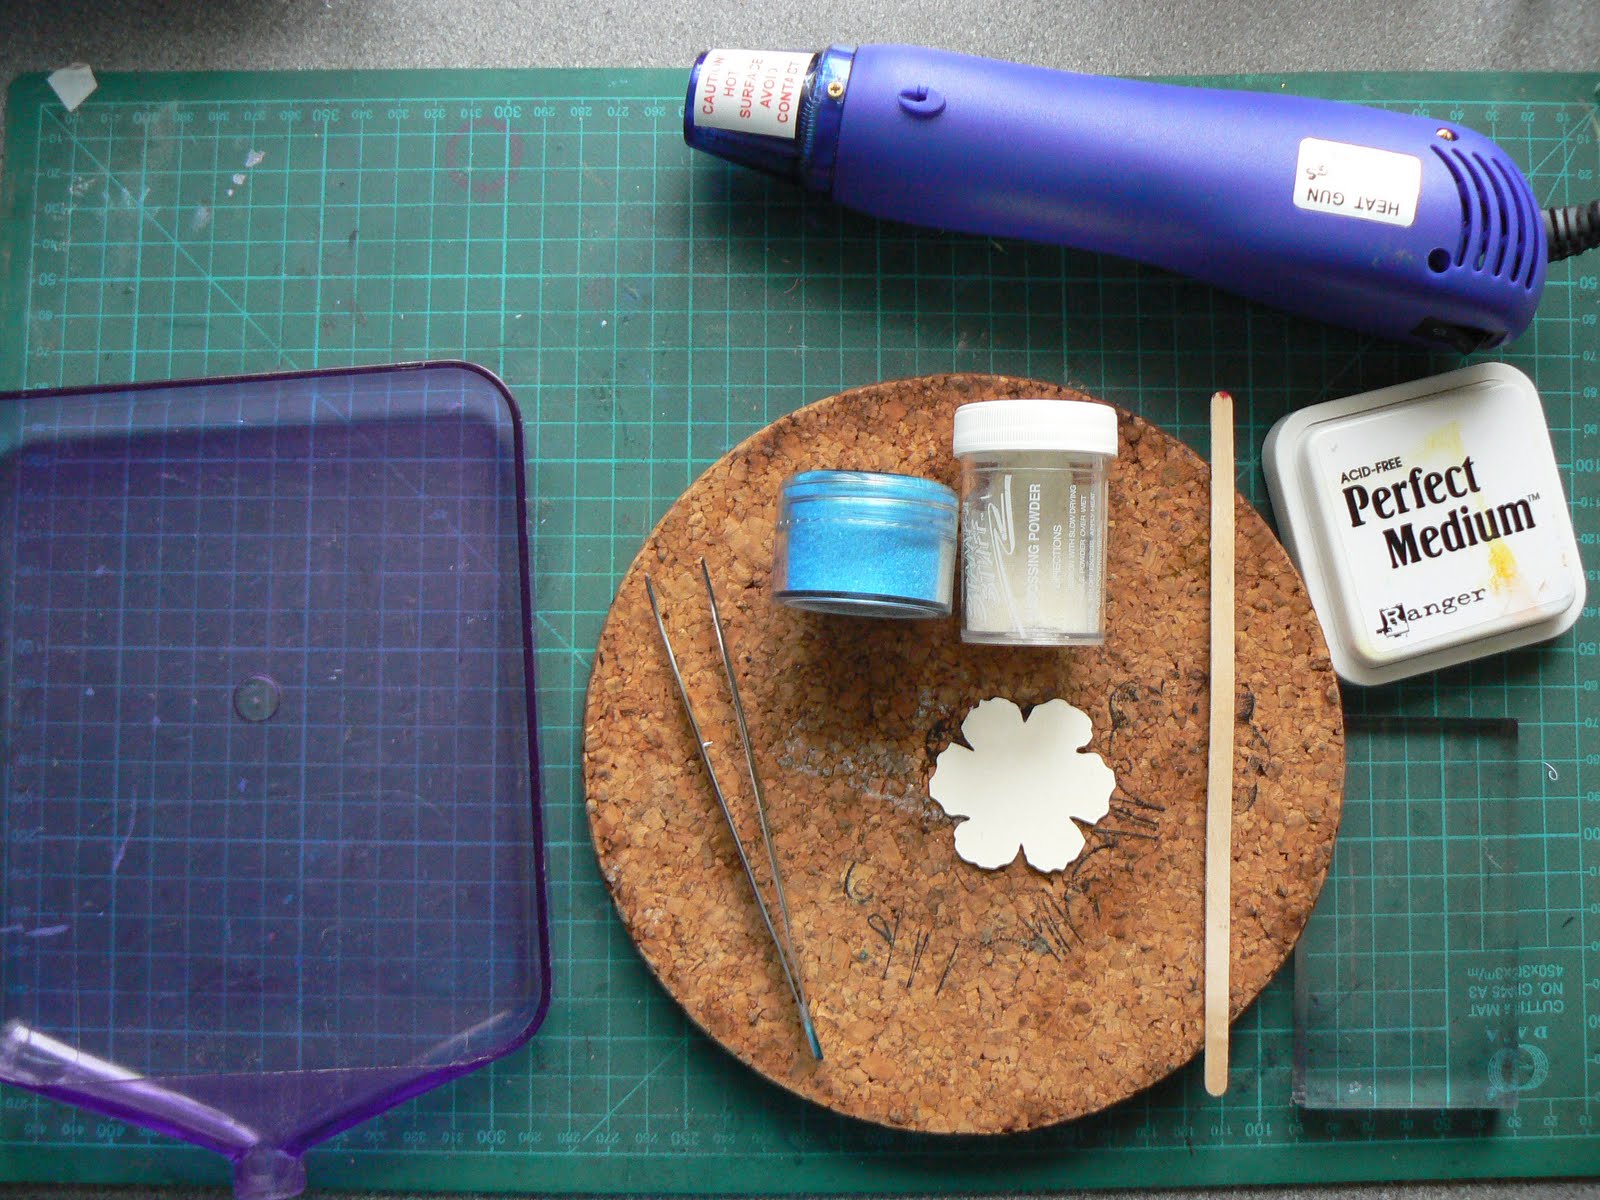
Before I start, a few words of warning. Be very careful with the molten powder, it gets very hot so mind your fingers and as there is a lot of heating involved be sure to do it on a heat proof surface. I've warped so many craft mats in my time it's not funny anymore so I now use a cork mat which works well for me.


1) Choose something sturdy to emboss. A piece of chipboard or die cut a shape using cardboard. In the photos I die cut a tattered flower from a cereal packet.


2) Ink up your shape well with clear ink and dip it into your UTEE (Ultra Thick Embossing Powder). I tip it into a tidy tray.


3) Make sure your heat gun is hot and then heat the powder keeping your gun fairly close to your shape until the powder melts. You can hold you shape down with a wooden coffee stirrer if it moves about. If the powder flies off, either your gun is not hot enough before you start or you are holding it too far away.


4) Allow the shape to cool and then repeat the inking and heating process again. Your shape should now have a smooth clear glaze.


5) Change the clear UTEE for a coloured embossing powder. If you don't have UTEE, any embossing powder will work fine. Repeat the inking and heating process with the colour.


6) Before you ink and heat for the last time, ink up a stamp of your choice with the clear ink and leave close to hand. Choose a stamp with a fairly open pattern. NB. ONLY USE RUBBER STAMPS (this technique doesn't do acrylic stamps any good)


7) Ink, apply the powder and heat for the last time (be careful not to over heat or the molten powder will start to run off your shape) and immediately stamp into the liquid embossing and LEAVE for a few seconds to allow the powder to set slightly.


8) Remove the stamp and your triple embossing is complete. Trim the excess powder that melted beyond the shape to get a clean edge, it comes away easily with scissors.


9) You can leave your design as it is or I like to brush mica powder into the design to highlight it and then give a quick spray with cheap hairspray to set it.


10) The other alternative is to use a coloured ink on your stamp when you stamp into the hot powder, which gives another finish.


You can also try mixing your coloured embossing powders by spooning a small amount of each onto your shape and heating. Just experiment, play and have fun.


I hope this has been helpful and would love to see what you create if you have a go. Here is a card I made with my shape and a Stampin Up stamp and would like to send it to Jill if you can e-mail me your snail mail address.


Thanks for stopping by and I just have to say how delighted DD was at winning the Try It On Tuesday challenge last week with her manly tag. She is only 9 so you can imagine how excited she is.

Sunday, 16 January 2011

A Tag For A Man

Afternoon lovely Bloggers. How's your weekend going? It's been wet and windy here both days so we haven't stirred very far which has been so nice for a change.

On Friday I was delighted to discover that I was the winner of Sheena Douglass' new stamp set of very adorable children and her new Spring WOW embossing powders so had a lovely two hours watching her demoing the stamps and powders on Create and Craft yesterday so that I know how to get the best out of them when they arrive.

I also had a lovely couple of hours with DD creating some tags for the Try It On Tuesday challenge which this week is a Tag For A Man.


I wanted to use my lovely Umbrella Man stamp which hasn't seen any ink yet so decided to stick to only using stamps on the same sheet, although I did have to use a swirl off another TH set. I limited my colour to Dusty Concord Distress ink for the main part of the tag and cut out some of the little tickets and stuck them on top before adding glossy accents. Umbrella man was stamped in black and clear embossed on a scrap of card and cut out and then added with some foam squares.


DD used the Nautical Stamps from The Stampman on top of an acrylic painted background. She stamped the boat, clear embossed it and coloured it with pencils before darkening the whole thing with a little bit of blue ink to take the whiteness away. She then added a Tim Holtz sentiment.

Thanks for stopping by and I have to say how thrilled I was to read all your comments about the star photo from the last post. I was quite pleased with how it turned out, the camera did all the work, I just set it to the Starry Night setting, put it on a tripod, pointed it at where I thought the stars were, pressed the shutter and waited for it to do it's stuff. We had to wait until we got back inside and loaded the pictures onto the computer to see what we had got. This was the best of the bunch. It's definitely worth a try if you don't mind standing outside in the dark for awhile.

Enjoy the rest of your Sunday.

Wednesday, 12 January 2011

WOYWW and a touch of Stargazing

Two posts in two days, yes I know. I'm determined to be a better blogger in 2011.

Well, here we are at Wednesday again which means it's time for a snoop around all those lovely desks with our esteemed leader Julia. I was determined that I was going to visit as many as I could last week and think I got around half so apologies if I didn't get to you. Those WOYWW's that get round everyone, you have my admiration, how do you do it!!


I took my photos while crafting was in full flow at lunchtime but when I came to upload them they are all out of focus, shocking for someone who is supposed to be interested in photography, so I have had to go and take them again. Trouble is I've tidied up since earlier so I thought I'd give you a guided tour of my room. It's only tiny. I stood in one spot and just turned round but you get the general idea.


As you can see, my chair doubles up as a table for my cuttlebug and dies and stuff.


This is the card I was making when I originally took the photos. It's one of those we all dread but needs must. I used my new Marion Eberson stamps from QVC and kept things very simple. All that white space would normal scare me to death but I think it works on this occasion, what do you think?


Lastly, I thought I would share a photo I took last night. We have been fascinated by the recent Stargazing programmes on TV and last night was the first clear one we've had so after tea, well wrapped up we went and stood in the garden eyes heavenward. I hope the neighbours weren't looking otherwise they'd have thought we were mad. I had a go at taking some photos and this was the best result. You might have to click on the photo to see it better.

Thanks for stopping by and for all those WOYWW's who are living in the areas of Australia suffering those terrible floods, our thoughts are with you. Stay Safe.